WordPress can be intimidating for those who aren’t familiar with the back end, which is why many businesses launching a website do so using a more user friendly platform like WIX or Squarespace. Unfortunately those two platforms aren’t known to be the best for SEO.
I’m a big believer in getting the fundamentals right when setting up a website, so I’m going to share six things I do to improve SEO when first setting up a WordPress site.
- How to Setup Your Permalinks in WordPress
- Using WP Rocket to Speed up Your Website
- Choosing to Display Archive Posts
- Why You Should Use an XML Sitemap with a WordPress Site
- Keep Your Plugins to a Minimum
- Don’t Forget to Make Your Site Visible to Search Engines
How to Setup Your Permalinks in WordPress
You can change your permalinks in WordPress by going to Settings and then Permalinks.
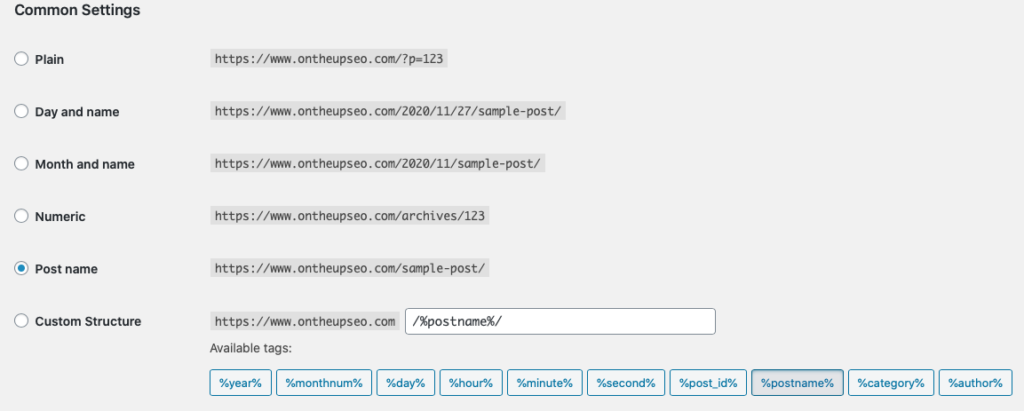
Once you’ve set up your permalinks in WordPress you shouldn’t need to change them again. Permalinks represent how your URL will appear to search engines and to website viewers in the browser URL bar. There are a number of options to choose from when setting up your permalinks:

There are a couple of considerations to make when considering which settings to choose. Firstly, the length of your URL, which includes your domain name, whether you’re going to write a lot of seasonal content or you’re a publisher (in which case you’d want to choose either of the date options), and how you’ll be getting traffic to your blog, in which case the Post name or Custom Structure options should be used to maximize SEO.
Your URLs should be friendly, meaning that they make sense to someone visiting your site (as well as a search engine). Have you ever visited a website and there are a bunch of letters, numbers, and sometimes special characters in the URL? Not pretty, right?
I generally always choose either Post Name or a Custom Structure (which includes the Category tag). Here’s an example of how to correctly set up a Custom structured URL:

What this means is that you want to include the category of the post as well as the post name. So if your category was ‘food’ and the post name was ‘donuts are awesome’, your URL structure would be:
https://www.mybrilliantsite.com/food/donuts-are-awesome
I don’t think you can go wrong if you choose either the category in your post or opt for the shorter post name. Remember, whatever your title of the blog post is, that’s what WordPress will choose, so keep SEO in mind when creating your title. If you want to take things one step further, you can also edit the permalink of the post before you publish it to have full control. Often I will do this to remove stop words like ‘and’, ‘of’, ‘but’ etc. and to keep the URL short.
Using WP Rocket to Speed up Your Website
My good friend, Jon Henshaw, who runs Coywolf published a brilliant article for WordPress users who want to ensure they have a fast site. There are some technical and non-technical pieces of advice in the post, but one of the items I wanted to pick up on is the use of WP Rocket.
If you’re not technical, managing your WordPress site can be intimidating, and then when you add on content creation, marketing, and support, it can become overwhelming too.
WP Rocket is a paid plugin that costs $49. It’s great for both large and small websites, whether you run a blog or an e-commerce site. I wouldn’t recommend this if I didn’t believe that it would benefit your site. Google has stated that Page Speed is an important factor to how a website ranks so keeping that in mind when deciding upon your theme and plugins is a huge consideration.
WP Rocket makes your WordPress site faster through a number of different ways – it caches your page making it super fast to load, it preloads the cache which Google search engine bot loves, it compresses the static files (think code like HTML and CSS) to reduce the size for quicker loading, and only loads images on your site when a visitor scrolls the page and sees them (known as lazy loading).
In addition, WP Rocket is super easy to set up and configure, and there is a team of folks who are there to help if you run into any issues.
Choosing to Display Archive Posts
This section is all about having one full version of your blog post on one URL at any given time. When setting up your WordPress site there is an option to display a full text post or a summary of your posts in feeds (you can find this under Settings and then Reading).

What this setting does is display full length posts anywhere on your site, either on a category page, or the homepage, or the tag page (if for some reason you’ve chosen to use tags). What this means is that you’ll have multiple copies of your post on different URLs which is not a good thing for SEO. So let’s say for example you create a post and choose to display the full text. This means that the full post will be on its own page, as well as the homepage (when first published) and subsequent archive pages after that, the category page, and if tagged more than once, on those pages too. That means at any one time you’ll have the same blog post existing on five different URLs.
Now, multiply that by just three or four and you can guess that things begin to get complicated. How does a search engine decide which of these pages is the page it should display to potential visitors to your site? This is why I always recommend you choose the summary option when choosing between the two.
Why You Should Use an XML Sitemap with a WordPress Site
An XML sitemap is a file that contains links to all of the pages on your website, and when you publish new content the file updates and includes that too. So why is this useful and do you need one?
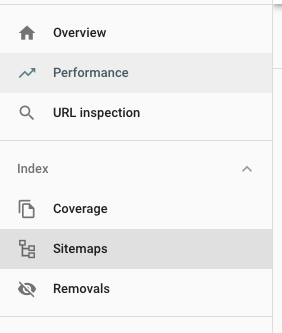
Google and other search engines use XML sitemaps as a way to find content on your website. To utilize this, you need to sign up for a Google Search Console account. Once you’ve verified your account, take a look at the navigation menu on the left and click on ‘Sitemaps’.

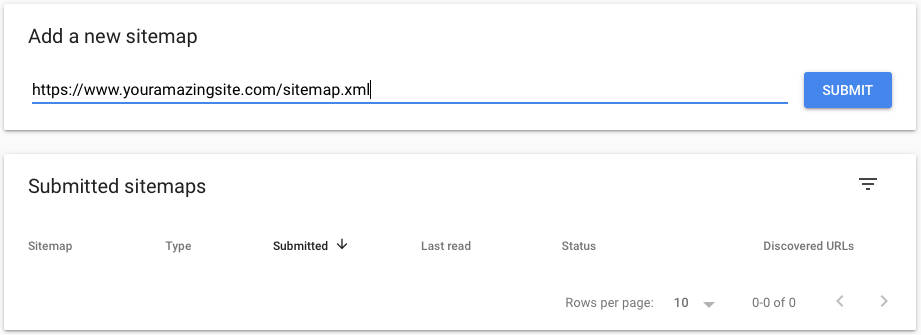
Now enter the URL where your XML sitemap lives. If you’re using WordPress, it is automatically generated and updated thanks to a recent update. The default URL is:
https://www.youramazingsite/sitemap.xml
Enter the URL, and click the submit button. Once submitted, Google will use the sitemap to find content on your site. Remember, you don’t really need to update this file, every time you publish new pieces of content it will be updated.

Keep Your Plugins to a Minimum
One of the reasons I love using WordPress as a Content Management System for my websites is that it’s so flexible. If you can think of a feature for your website, the chances are that someone else has already had that same thought and created a plugin for it. However, one of the many issues I see with WordPress websites is something I refer to as plugin overload.
When it comes to plugins I like to run a tight ship. I’ll only use a plugin where I absolutely have to, so here are a few things to keep in mind as you look to add plugins to your website:
- Anybody can create a plugin and upload it for the WordPress community to use. This means that you could be using a plugin for your website developed by a complete newbie to WordPress development. This plugin could leave your site wide-open to hackers who use plugin exploits as a way to do serious damage. I like to use plugins from recognized companies and experienced developers who are used to developing them, and will often pay because I know I’m going to get great support and won’t have to worry much about them not being updated.
- Once you’ve found a plugin or three to use, you need to keep them updated. Developers will add new features or patch security issues when they release updates so it’s important to make sure you’re using the latest version of the plugin. Just navigate to where your plugins are in your WordPress admin and hit update. That’s it! WordPress makes this super easy to do.
- Plugins slow down your site big time. For a speedy website I recommend to keep your plugins to a minimum. Each plugin functions independently of one other and often cause conflicts with whatever theme you use and other plugins on your site. The more plugins you have on your site, the longer it takes for your pages to load. I like to think of plugins as ‘must haves’. When you think of adding a plugin you should ask yourself ‘what kind of benefit is it adding to the readers of my site?’, and ‘can this be achieved without using a plugin?’
Don’t Forget to Make Your Site Visible to Search Engines
I recently helped a friend who had set up their site with WordPress and couldn’t figure out why it wasn’t showing in Google. When the brand name of the site was entered into Google the site’s Eventbrite listing, Facebook page, Instagram page and other social networking sites were all listed, but none from the website.
In WordPress there is a very small checkbox that is easy to miss in the Reading section under Settings.

Before you launch your website, make sure that this box is unchecked. I’ll say it again – please make sure that this box is unchecked. If you leave it checked you’re essentially telling search engines to not make any of your website’s content available to people searching online. I can’t emphasize enough how important this is. You could be missing out on thousands of readers and customers if you leave it checked.
If you have a WordPress site and you’re finding yourself in the same situation as I mentioned about my friend, this is the first place you should check.
Consumer behavior has changed dramatically during the pandemic. People who are doing research about a product or purchase are now switching to doing the vast majority of their research online. While doing all the things mentioned in this post won’t guarantee you number one spot in Google, it will set you up for a strong SEO foundation to build on, and help your site be accessible to the millions of people using search engines.

Lee Smith
Nashville SEO Consultant
Lee is an experienced Search Engine Optimization professional having 15+ years of experience and creates content to help website owners succeed with SEO and WordPress.